Booking Whatsapp Communications
Nexaflow Editor
Manage WhatsApp booking messages
Use WhatsApp booking messages to keep patients and guardians informed about registration, appointments, changes, treatment bills, payments, and follow-up visits.
This guide explains how to connect your clinic’s sender, create message templates, choose the information that fills each placeholder, and link approved templates to booking workflows.
#Before you begin
You will need access to your clinic’s Booking settings and a connected WhatsApp Business account. Connect the clinic number through Agent → Channels → WhatsApp, and enable the Booking module on that agent. The sender and Booking module must belong to the same account owner.
You do not need a separate WhatsApp Broadcast module for Booking messages.
If WhatsApp is not connected yet, follow the WhatsApp setup guide first. Ask your administrator for help if the clinic number does not appear or the page reports that sending is disabled.
#Open WhatsApp settings
- Open your Booking manager.
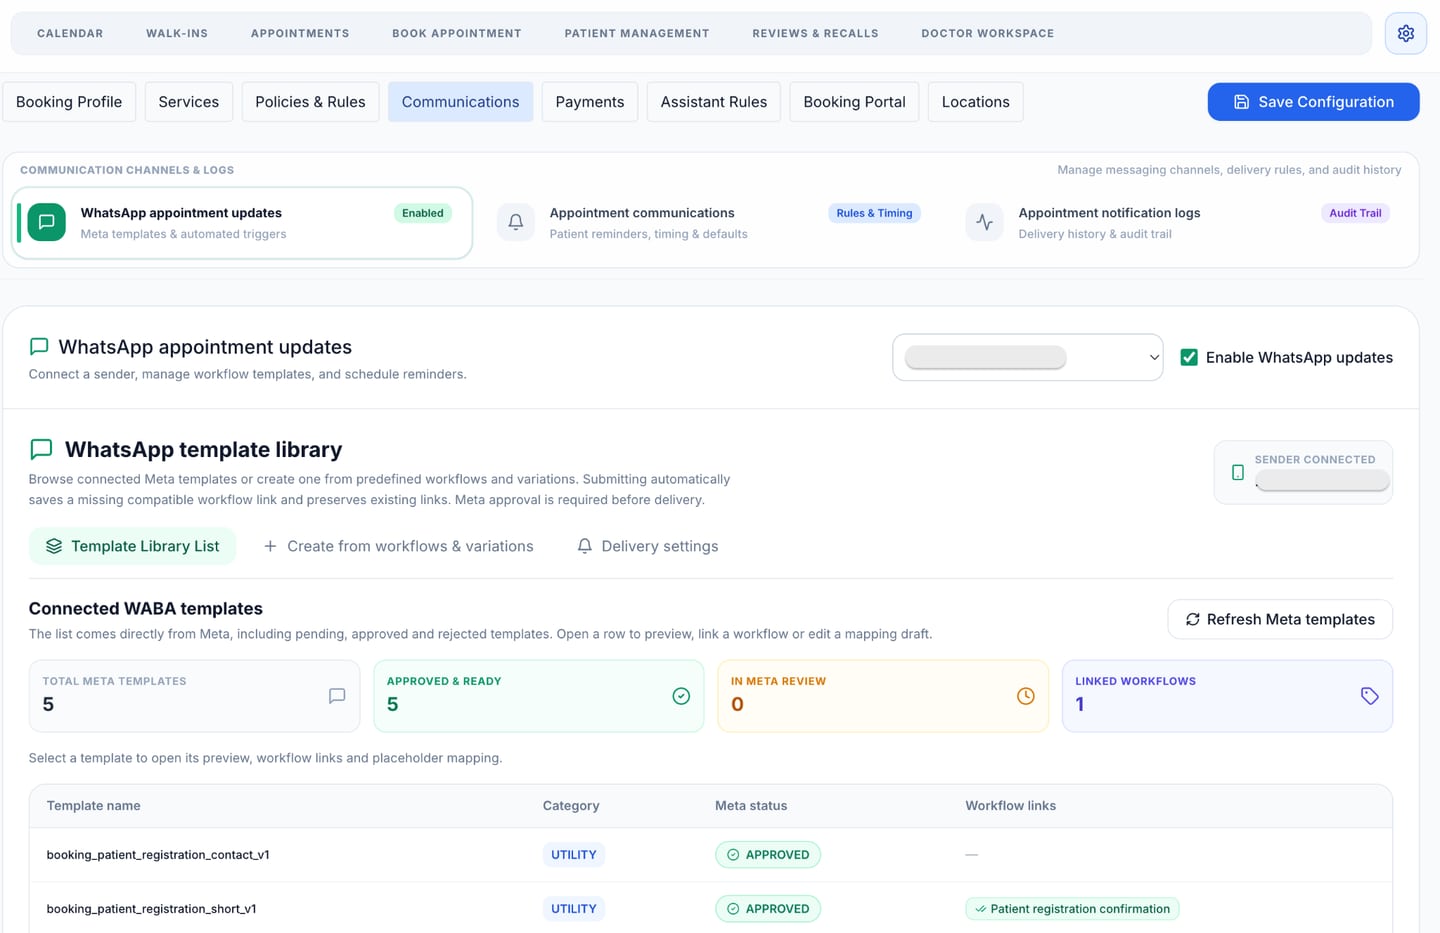
- Open Settings → Communications → WhatsApp.
- Enable WhatsApp updates in the header.
- Select Clinic sender beside the switch. This dropdown is shown only while updates are enabled.
- Click Save Configuration to save the sender and delivery settings.
Turning updates off does not delete your templates or saved workflow links.
The WhatsApp area has three tabs:
- Template Library List: view templates from the selected sender’s Meta account, inspect their approval status, and open their workflow links and parameter mapping.
- Create from workflows & variations: create and preview a local draft, then submit it to Meta when ready.
- Delivery settings: choose appointment-reminder timings.
#Understand templates, workflows and parameters
A template is a message reviewed by Meta, with a name, language, category, and body. The body contains your approved wording and numbered placeholders for changing information.
A workflow is the booking event that uses that template—for example, a new patient registration, an appointment reminder, or a payment receipt.
A parameter is the value that fills a placeholder. For example:
Hello {{1}}, your appointment at {{2}} is confirmed.text
If parameter 1 is Alex and parameter 2 is MyClinic, the message preview reads:
Hello Alex, your appointment at MyClinic is confirmed.text
This is a simple illustration, not a ready-to-link template for every workflow. Each workflow has its own required fields and order. Start with its predefined variation to get the correct contract.
Example values are illustrative. Editing an example does not change a patient record, booking, bill, or the values sent for a real event.
#Create a template from a workflow
- Open Create from workflows & variations.
- Choose the booking workflow you want to communicate about.
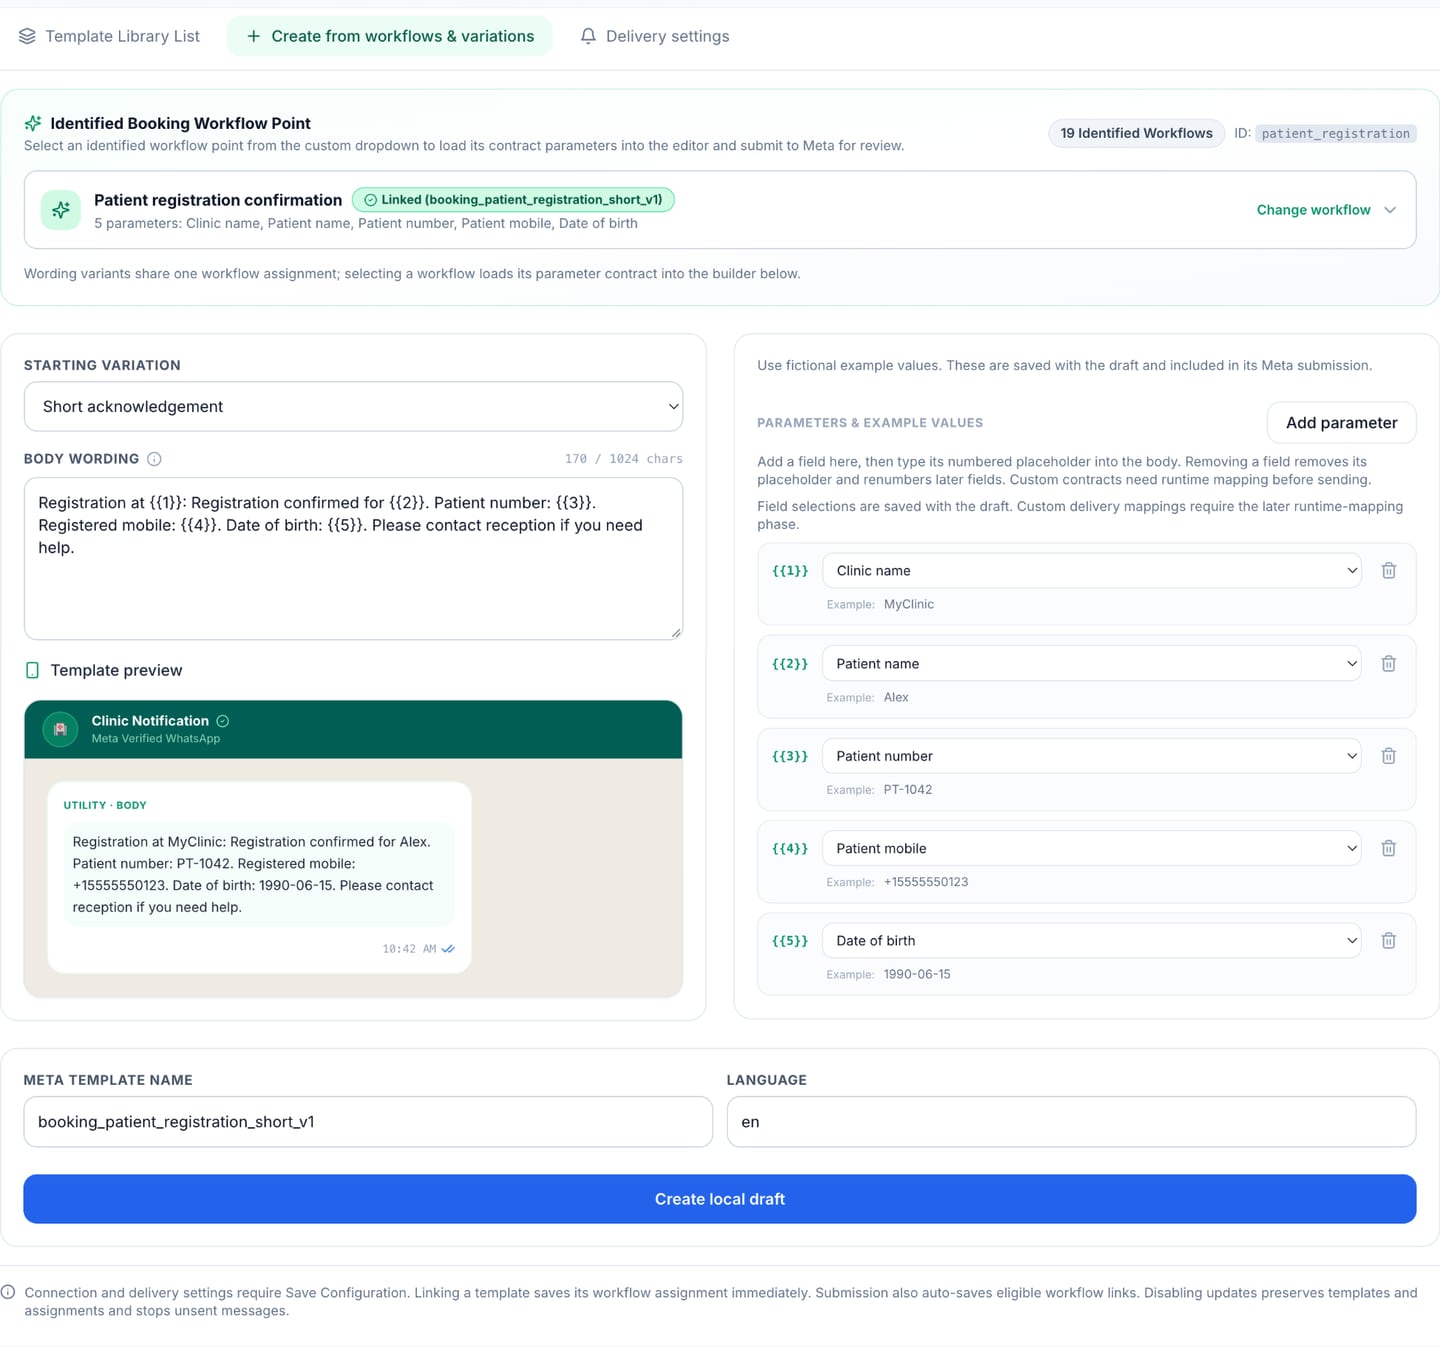
- Select a Starting variation. The editor loads its body and default parameter fields.
- Edit Body wording on the left. Keep the numbered placeholders where the changing information should appear.
- Review Parameters & example values on the right. Each parameter has a workflow-field selector and an example value.
- Use fictional examples such as Alex and MyClinic, then check the message preview below the body.
- Review the Meta template name and Language near the bottom. Use a unique name containing lowercase letters, numbers, and underscores. The suggested name is a starting point; the workflow label and Meta template name are separate.
- Click Create local draft. A draft preview and review actions appear below the editor.
- Click Save Configuration to retain your local draft before leaving the page.
Creating a local draft does not submit it to Meta or send a message to a patient.
You can hover over or focus the information icon beside Body wording for guidance on the supported template format.
#Add or remove a parameter
Manage the parameter list in the form, then place its numbered placeholders into the body.
Add a field
- Click Add parameter in the parameter form.
- Choose an available field from the selected workflow.
- Review the example supplied for that field and edit the example if needed.
- Manually type the new placeholder, such as
{{6}}, into the body at the intended position. - Check the preview before saving.
Adding a form field does not automatically insert wording or a placeholder into the body. Typing a new placeholder into the body does not automatically create a form field.
Remove a field
- Click the trash icon beside the field you want to remove.
- Its placeholder is removed from the body.
- Later parameters are renumbered and their field choices and examples stay together.
- Read the body again and tidy any sentence or punctuation left behind.
Keep the sending contract in mind
The current Booking sender uses each workflow’s existing ordered fields. Adding an extra field or changing that order can create a template that is suitable for drafting but is not yet supported for sending.
For example, registration currently supplies five values: clinic name, patient name, patient number, mobile, and date of birth. The contact-details variation adds a sixth value. It can be prepared and submitted, but approval alone does not add that extra value to registration delivery.
For a template you want to use immediately, keep the predefined compatible field contract. Additional mapping choices can be saved as drafts for later use.
#Resolve validation messages
Before creating or submitting a draft, check that:
- Every declared parameter appears in the body once, with consecutive numbers in order.
- There are no missing, undefined, duplicate, named, or malformed placeholders.
- Every parameter has an allowed workflow-field choice and a non-empty example.
- The body contains ordinary wording before the first placeholder and after the last one. Punctuation alone is not enough for the app’s boundary check.
- The body is no more than 1,024 characters.
- The template name and language code are valid.
If the editor offers Add opening and closing words, review the proposed wording before using it.
Nexaflow currently supports Utility templates with a BODY component only for these booking sends. A template with a header, footer, or buttons may be visible in Meta and previewable in the list, but that does not make it compatible with Booking delivery.
#Submit the draft to Meta
- Open the local draft’s preview and click Review submission.
- Check the template name, language, wording, and synthetic examples.
- Click Submit to Meta once when you are ready.
- Open Template Library List and refresh the templates to check the actual Meta result.
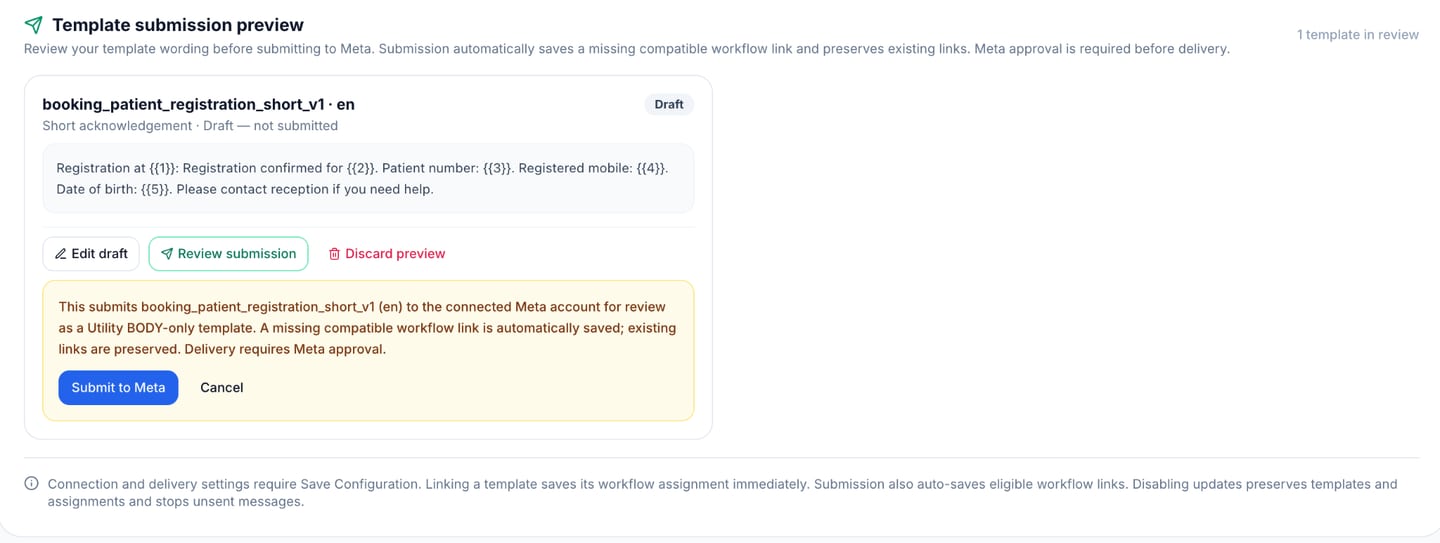
The screenshot shows a local Draft, even though the preview heading says “in review.” Only submission to Meta starts Meta’s review; this preview does not indicate submission or approval.
Submission does not mean approval. Meta can approve, reject, pause, or otherwise change a template’s availability.
The application can automatically save a missing compatible workflow link when you submit an eligible template using the saved clinic sender. It preserves an existing explicit link or compatible approved fallback. A newly submitted template must still receive Meta approval before it can be used for delivery.
If a request times out or the submission result is uncertain, refresh the Meta list before trying again. The template may already have been created. The same name and language should not be submitted repeatedly.
#Read the template list
Template Library List shows:
- Template name: the name held in Meta.
- Category: the category returned by Meta.
- Meta status: the current approval or availability state.
- Workflow links: booking workflows assigned to that template.
Click a row to open its details and preview. Check its language and components there; the same name in another language is a separate selection.
A local draft is not an approved Meta template. An approved template is not automatically linked to every workflow, and a linked template must still match the workflow’s sending contract.
#Link an existing approved template to a workflow
- In Template Library List, open the template you want to use.
- Check the exact name, language, category, approval status, and components.
- In Template preview & workflow linking, choose the intended workflow.
- Review its parameter sources and the compatibility information.
- Click Link using current sending contract.
- Wait for the successful save message, then close the popup.
This link saves immediately. You do not need to click Save Configuration again for that link. You can reload the page to confirm it remains in the template list.
Selecting a workflow in the dropdown only selects the contract to inspect; it is the link action that saves the assignment.
You can link an existing compatible template from your connected account—you do not have to create a new one from a predefined variation. The template must be approved, have the supported Utility BODY-only format, and match that workflow’s required fields and order.
If linking is unavailable, read the reason shown. A different number of parameters, a different order, a non-Utility category, unsupported components, or missing approval can prevent a live link.
To replace an established link, explicitly select and link the new approved template. Submitting another variation should not silently replace the current assignment.
To remove an assignment, click Unassign, close the popup, then click Save Configuration. Unlike the link action, removing an assignment is saved with the overall configuration.
#Review parameter mapping for a submitted template
The popup shows a compact row for each placeholder:
- A component marker, such as B for BODY or H for HEADER.
- The placeholder index, such as
{{1}}. - A workflow-field selector.
- A muted, read-only example.
- A modified-mapping icon when the selection differs from the standard sending contract.
Examples supplied by Meta are read-only here because the template has already been submitted. Changing a workflow-field selection does not rewrite Meta’s approved body or submitted examples.
To prepare a mapping:
- Select the intended workflow.
- Review the suggested source for every placeholder.
- Choose another available workflow field where needed. If offered, a fixed-value choice records a mapping choice rather than editing the template’s wording.
- Use Use suggested mapping if you want to restore the suggestions.
- Complete every placeholder and click Save mapping draft.
- Wait for success. The mapping draft saves immediately and can be reopened without another Save Configuration action.
Current limitation: a saved custom mapping is a draft. It does not yet change the values used by live delivery. For active sends, use the standard compatible workflow contract. The interface must not present extra or reordered values as active simply because a mapping draft was saved.
If the Meta body or components change after a mapping was saved, refresh the template and review the mapping again before saving.
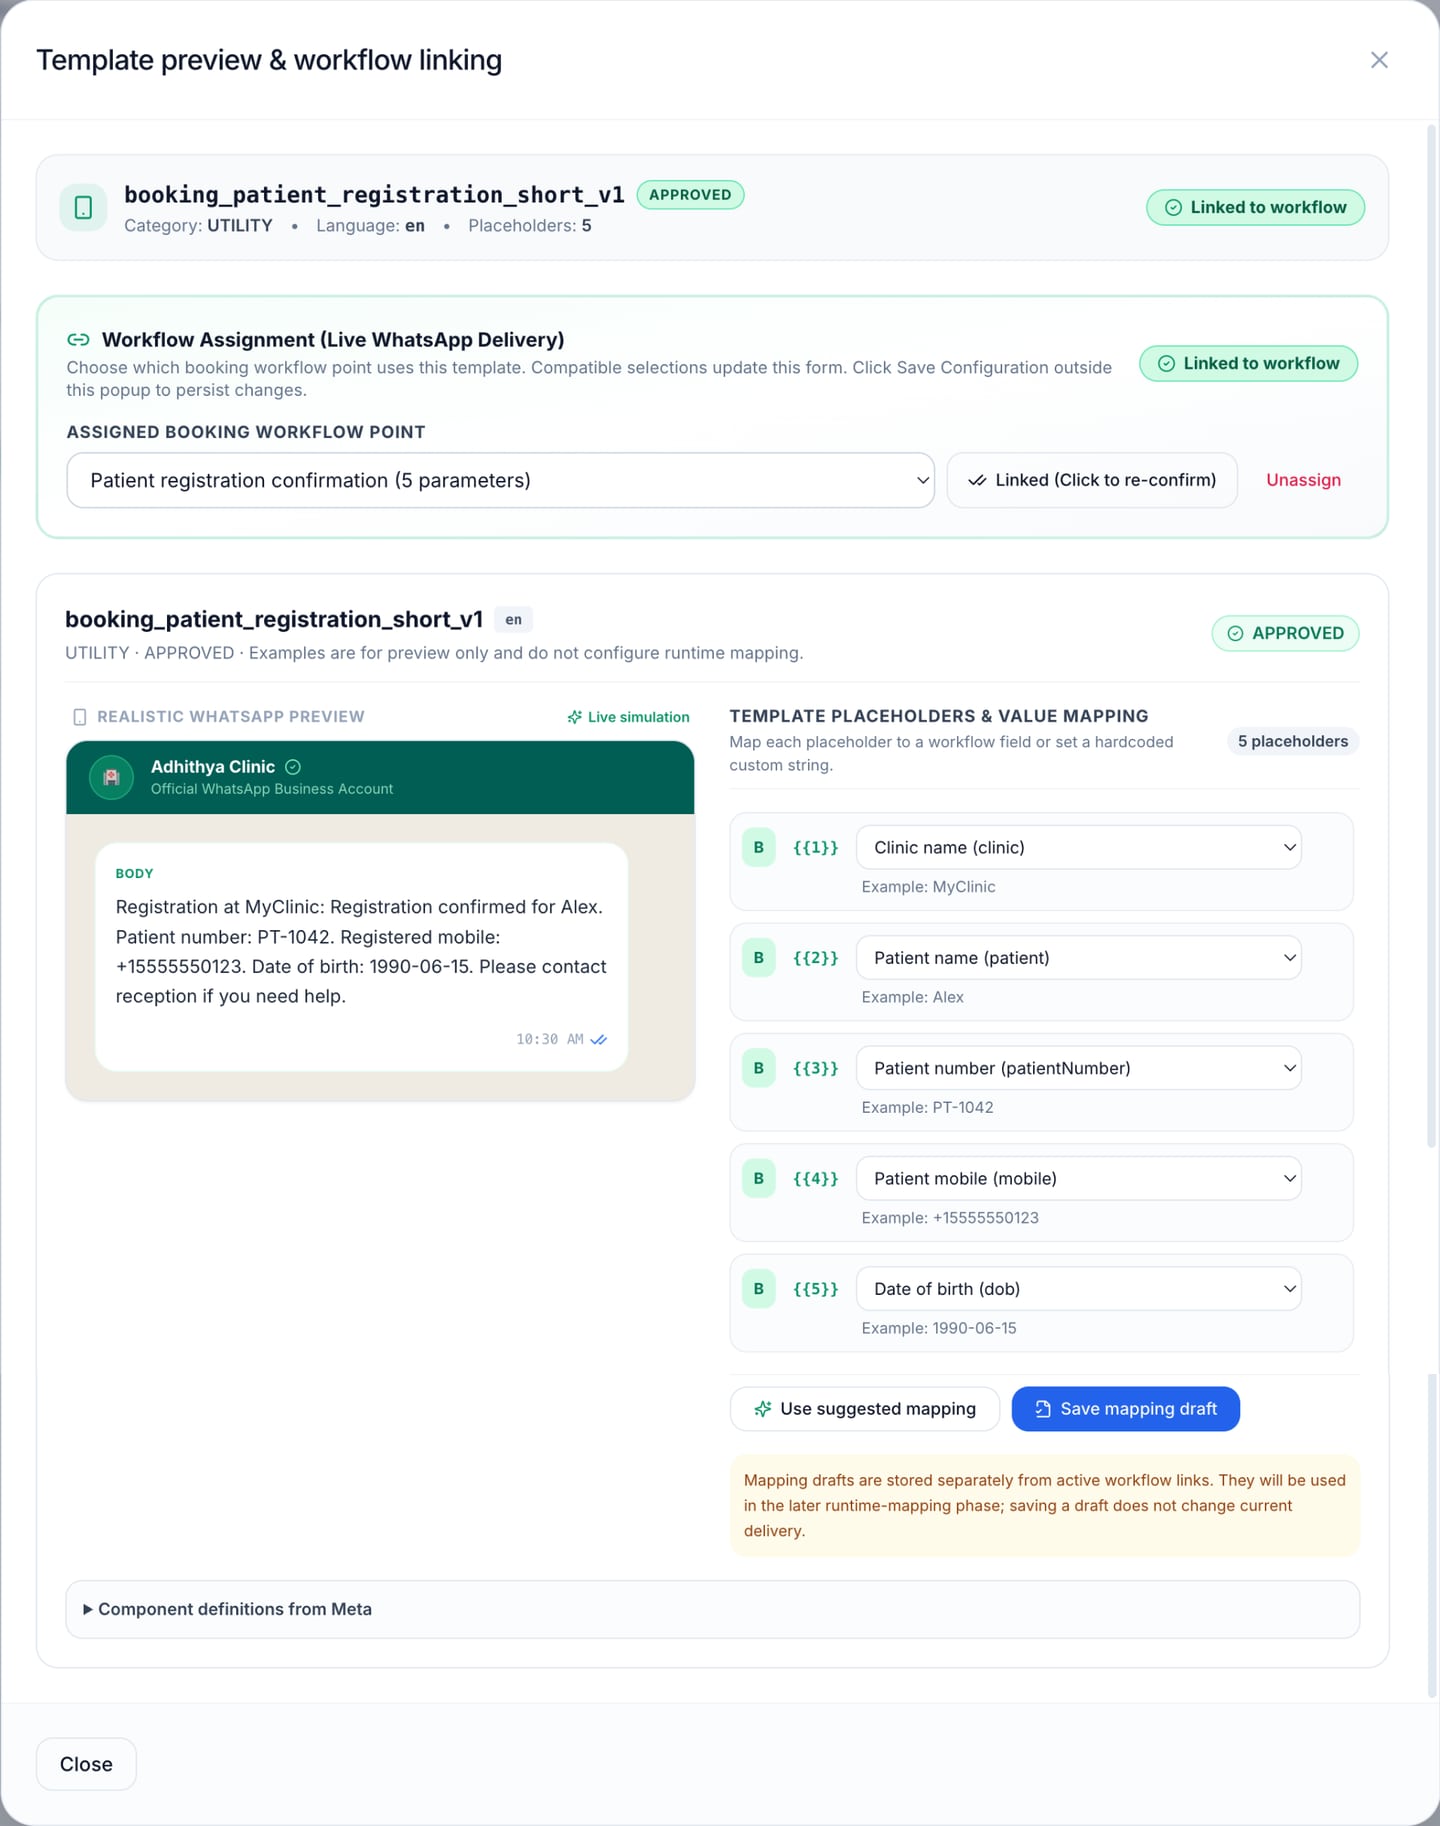
The captured screen includes an older instruction to save configuration after linking. The link button now saves immediately; Unassign still requires Save Configuration. Saving a mapping draft remains separate from active delivery.
#Change an approved message
The preview popup is for inspecting a submitted template, selecting its workflow, and preparing parameter mapping. It is not an editor for the already-approved Meta body.
To prepare new wording:
- Open Create from workflows & variations.
- Create a new draft with the revised wording and a unique template name.
- Review and submit it to Meta.
- Wait for approval and check compatibility.
- Explicitly link the replacement to the workflow when you are ready to switch.
Keep the existing working assignment until the replacement is ready.
#Choose reminder timings
- Open Delivery settings.
- Under Appointment reminders, select the desired times before the appointment.
- Click Save Configuration.
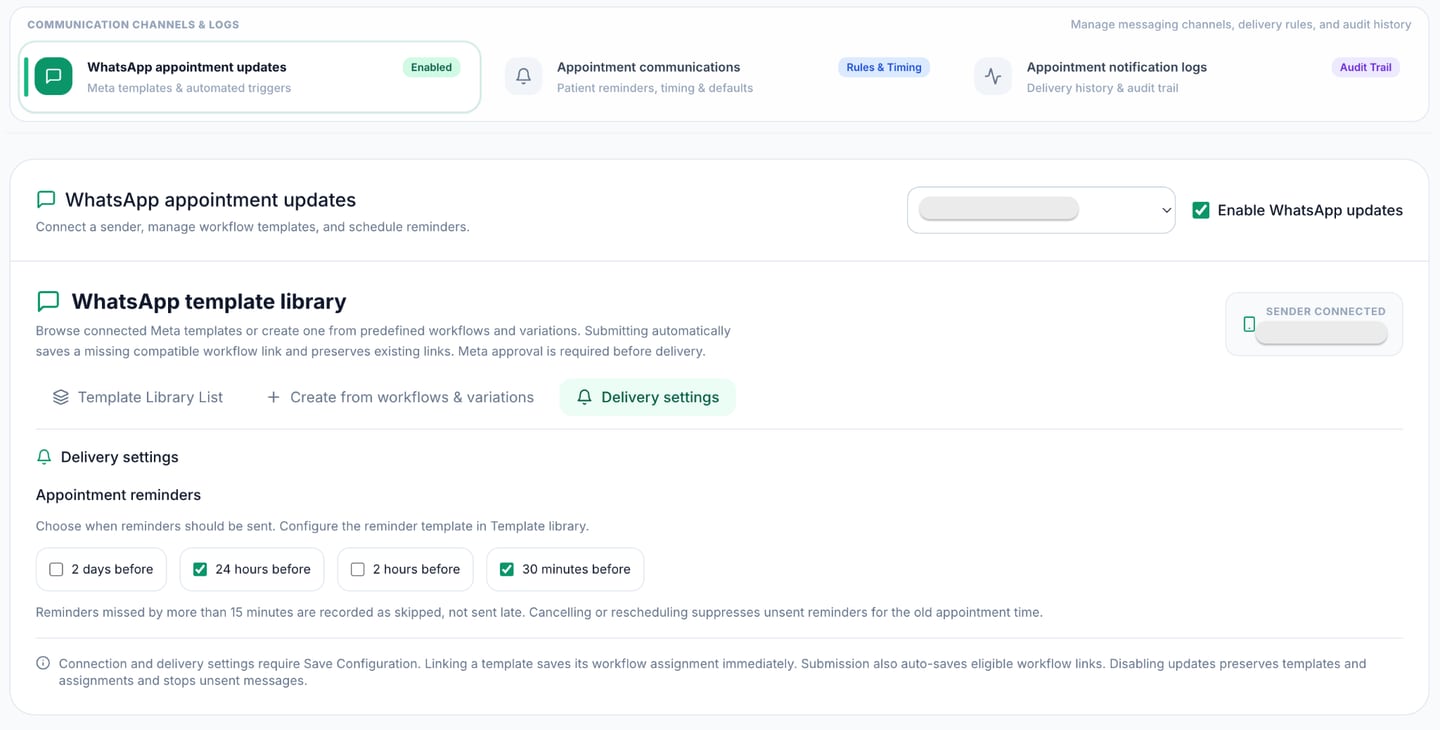
The reminder wording is managed in the Template Library. There is no separate visit-instructions text editor in this screen.
Reminders depend on a confirmed appointment, its WhatsApp contact/consent, enabled delivery, and a compatible approved reminder template. Cancelling, completing, or rescheduling an appointment suppresses reminders that are no longer relevant. A reminder more than 15 minutes late is recorded as skipped rather than sent late.
#When patients and doctors receive messages
The action, saved contact details, notification preferences, and linked template together determine whether a message is queued.
Registration and appointments
- Patient registration confirmation: acknowledges a newly registered patient.
- Appointment confirmation: confirms a new appointment.
- Walk-in confirmation: confirms the walk-in appointment details.
- Appointment reminder: reminds the selected contact before the appointment at your configured times.
- Reschedule proposal: proposes a new time and includes the confirmation link. Sending a proposal does not itself confirm the new appointment time.
- Patient/guardian reschedule confirmation: confirms the accepted or applied change.
- Doctor reschedule notification: notifies the doctor through the mobile number in the provider profile.
- Appointment cancellation: confirms the cancellation; unsent reminders for the cancelled appointment should not follow it.
- Visit completion: acknowledges a completed visit.
- Missed appointment / no-show: follows the no-show workflow.
A designated guardian contact can be used for patient-facing updates. A guardian recipient is different from a wording variation that needs additional guardian-name data; the latter must also have compatible sending support.
Treatment estimates and payments
- Treatment estimate: the explicit estimate action sends the estimated treatment cost. Sending an estimate does not record a payment.
- Treatment bill / balance update: communicates the saved bill, amount paid, balance, and payment-plan information when the send option is selected.
- Payment receipt: acknowledges the recorded payment and its receipt details when the receipt option is selected. Partial and fully settled payments must show the appropriate balances.
If the payment or treatment saves but its notification fails, do not enter the same payment again just to resend a message. Check the notification result instead.
Reviews and recalls
- Follow-up / review invitation: invites selected patients to a review campaign.
- Visiting specialist notification: announces the configured specialist visit date or date range.
- Recall reply: booking link: acknowledges an affirmative response and provides the appointment-choice link.
- Recall reply: declined invitation: acknowledges a decline without making a booking.
- Recall reply: preferred time received: acknowledges the requested time; it must not claim a confirmed appointment before booking is completed.
- WhatsApp updates: STOP / START acknowledgement: confirms a recipient’s preference change using its approved template. Opt-outs suppress ordinary booking messages, and missing acknowledgement approval must not prevent the preference itself being saved.
Review and recall campaigns use the clinic’s configured Booking sender and their own workflow assignments. An existing campaign template does not automatically cover every reply step.
#Check notification delivery
Open Settings → Communications → Logs. Filter to WhatsApp where useful and use Refresh status to inspect the event.
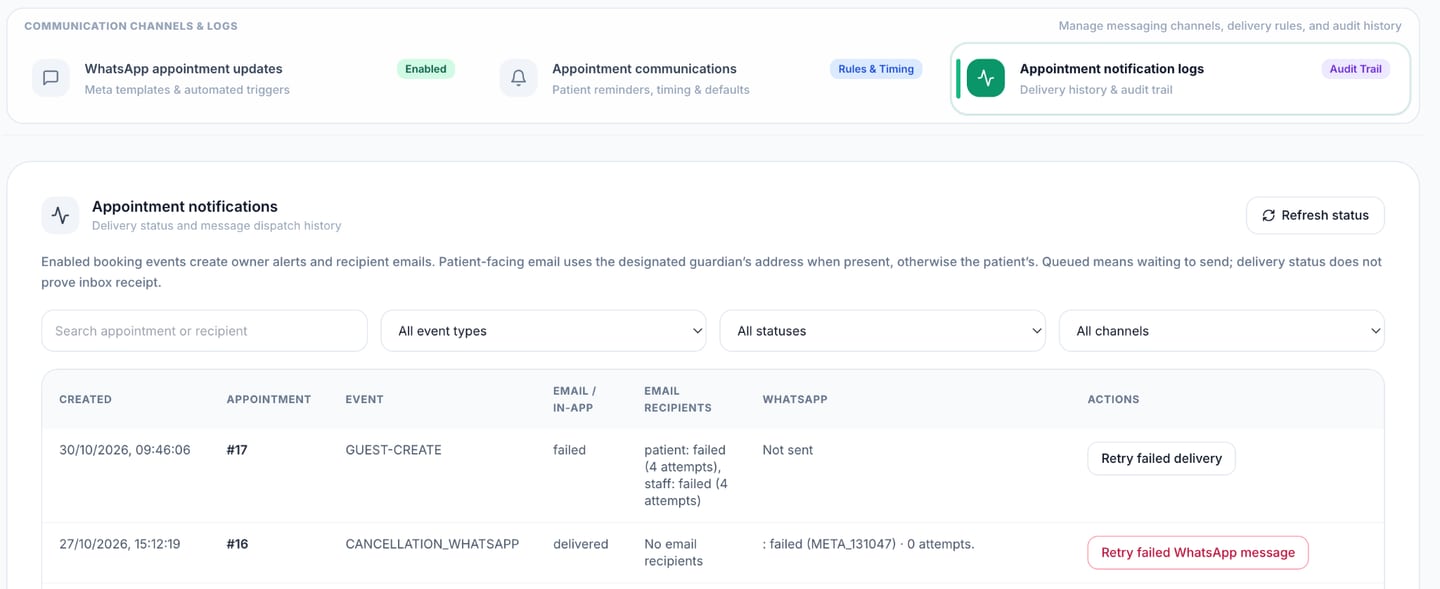
The records shown illustrate failed delivery and retry controls; they are not examples of successful receipt.
The status tells you where the message is in its journey:
- Queued / pending: waiting to be processed.
- Sending: a send is in progress.
- Accepted: WhatsApp accepted the request; delivery is not yet confirmed.
- Sent / delivered / read: WhatsApp status evidence. Read receipts may be unavailable even when a message was delivered.
- Blocked: a prerequisite prevented sending; check the displayed reason.
- Failed: a known failure. Correct the cause before using an offered retry action.
- Unknown: the outcome is unconfirmed and WhatsApp may already have accepted the message. Do not repeatedly resend it.
- Skipped: the message was intentionally suppressed, for example because the appointment changed or the recipient opted out.
A “queued” notification is not proof that the patient received it. Check the notification status and, during setup, confirm receipt on a consenting test handset.
#Fix common setup issues
The clinic sender is missing
Check that the clinic number is connected to the correct agent, the Booking module is enabled on that agent, and the sender belongs to the Booking module’s account owner. Ask your administrator to check the connection rather than choosing another clinic’s sender.
A template is approved but cannot be linked
Approval and Booking compatibility are separate checks. Open the template and inspect its exact language, category, components, parameter count, and positional order. Additional fields and custom mapping drafts do not automatically add sending support.
A linked template is not sending
Check the enable switch, saved sender, event preferences, required patient/guardian/doctor contact, consent or opt-out state, current Meta approval, and the notification log. A server-disabled warning needs your administrator’s help.
A workflow selection disappeared after closing the popup
Selecting the workflow is not the save action. Click Link using current sending contract and wait for success. A successful link saves immediately; a local draft or unrelated setting still needs its own save action.
A mapping saved but the sent values did not change
Custom mapping is currently saved as a draft. It is not applied during sending yet. Keep live templates compatible with the workflow’s standard ordered values.
A submission timed out
Refresh the Meta template list before retrying. Meta may already have created the template. Do not submit the same name and language repeatedly.
#Before using messages with patients
- Use fictional examples while drafting.
- Obtain the recipient’s permission and use the correct patient or guardian contact.
- Confirm approval and link compatibility for each workflow you plan to use.
- Try a registration, appointment update, and payment notification with a consenting test recipient before broader use.
- Verify the message’s actual names, dates, timezones, amounts, links, and delivery evidence.
Outside the 24-hour customer-service window, WhatsApp requires approved templates. The booking workflows in this guide use templates for their notifications even when that window is open. Meta approval remains external to Nexaflow; see the WhatsApp Business Messaging Policy.
Related Guides
Helpful for you?
Help us improve the world of AI agents.
On this page
Support Hero
Have a custom workflow need? Our engineers are ready to help.